Donate2 Donation Forms
Donate2 Donation Forms
The Donate2 Donation Form allows you to create customizable donation forms in a quick and easy way. Donate2 forms can be edited to match your organization’s branding or for a specific purpose. If you’re looking for a form with even more donation and customization options, please check out our Flex2 forms.
When starting a new form, keep an eye out for these fun features:
- Lock/Unlocked - It is very good practice to get into the habit of locking a form once you’re finished editing it.
- TEST and LIVE links - To view what your forms will look like on a larger screen than your Preview, utilize the TEST and LIVE links. Your LIVE link is the link you will use to share your form with the public.
- Preview Screens - The Preview screen to the right of your collapsible menus allows you to view what the form will look like in real time on a mobile device.
We like to call each section of our menu a collapsible! Every form is customized by adjusting settings and content in our collapsible menus. The ten different collapsibles are:
Template
Header
Questions
Donor Address
Payment Page
Thank You Page
Titles and Labels
Social Sharing Previews
Tessitura TEST and LIVE Environments
Messaging
Donation Editor changes are automatically saved as you work.
Template
The default template setting is a form set on a white background. You can customize your background and settings in the Presentation Manager. It is highly recommended to utilize this feature. A Presentation Manager can be applied or removed at any time by selecting Presentation from the Type drop down menu and then selecting the Presentation Manager from the Presentations drop down menu.

Header
Your header can be personalized to match with your branding and will appear on both the Payment Page and the Thank You Page. If you have a Presentation Manager that includes a logo, you may not need this or you can use this to include an image rather than a logo.

If you have a logo image that you’d like to use, upload it in the Embedded Logo section. You will be able to view what it will look like on the right side of the screen. Recommended image size is between 800 to 1000 pixels wide by 250 to 400 pixels tall at 72 dpi. When in doubt, check with your marketing department!
The Alt Tag allows you to add a short description for your image that is accessible to screen readers or shows as text if the image doesn’t load.
The Rule option will allow you to place a straight line separating your embedded logo from your text. This can be set to “Yes” which will allow you to enter a hex code or RGB specific colors to match with your branding. If set to “No,” the line will not appear.
Color Selector
Some browsers may show an eyedropper available in the color selector. This can also be utilized to match a color in an uploaded image.
Questions
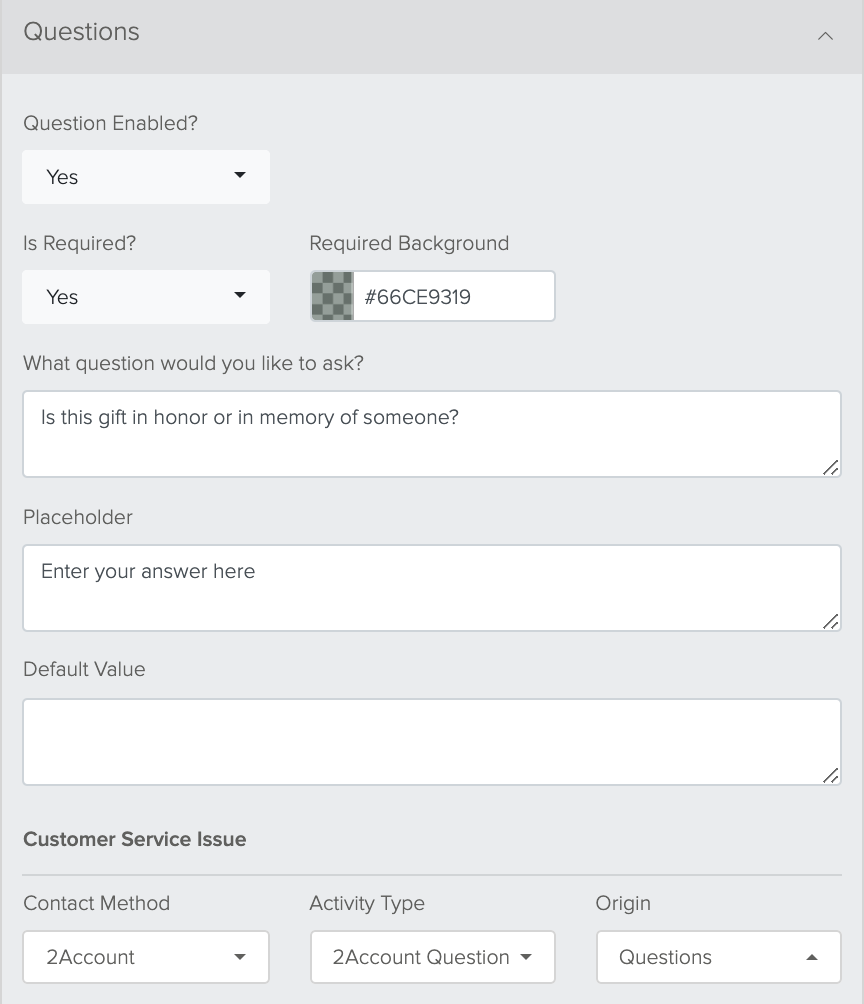
Questions allow you to add a customizable open text field to your form that can be used to ask questions or gather information. This is an optional feature and can be enabled on your form or disabled. By default, the Questions feature is not enabled.
If Enabled:
Your question can be set as a Required question or not. The Required Background automatically defaults to a light green color when marked as “Required.” This can be edited with a hex code or RGB specific colors to match your branding should you choose to have it colored; however, you are also free to set it to white if you don’t want a color. The purpose of this feature is to help patrons visualize what is required on your form. If it is set to required, the color of the field will use the Required Background color and the payment cannot be processed until it is filled out by your patron.
The Question field can be anything. Examples include: “Is this gift in honor or in memory of someone?”, “How did you hear about us?”, etc.
The Placeholder field allows you to add instructional or example text in the open text box on your form. Examples include: “Enter your answer here”, “Please let us know”, etc.
The Default Value field can be a preset answer to the question.
When the Questions feature is enabled, the results will be put into a Customer Service Issue. The default Customer Service Issue settings will use the same as you have set up in your Tessitura Live General Purpose CSI. To use specific CSI settings for your form, you can create a new Tessitura Contact Method (if needed) Tessitura Activity Type (will be needed) and Tessitura Origin (if needed). Select the appropriate options for Contact Method, Activity Type, and Origin for your form. When the form is processed, the Questions feature will provide the Question and Answer in the CSI configured.
Donor Address
Donor Address allows you to gather address and phone number information from your patron. This feature can be enabled or disabled.

If enabled:
The default setting for Overwrite Address is set to No. This means it will not overwrite an address connected to an account that matches a patron’s email address. If this is set to “Yes,” the address can be overwritten in Tessitura. Use this option carefully.
The Title defaults to “Address”; however, you can edit this to your preferences. Examples include “Your Contact Info” or “Mailing Address”, etc.
The Required Background automatically defaults to a light green color for fields marked as “Required.” This can be edited with a hex code or RGB specific colors to match your branding should you choose to have it colored; however, you are also free to set it to white if you don’t want a color. The purpose of this feature is to help patrons visualize what is required on your form.
Your Prefix, First Name, Last Name, Suffix, Address Lines 1 and 2, City, State, Zip, Country, and Phone number can be enabled and/or required at your discretion. Labels can be edited to meet your needs. Example, some countries refer to the Zip while others call it Postal Code.
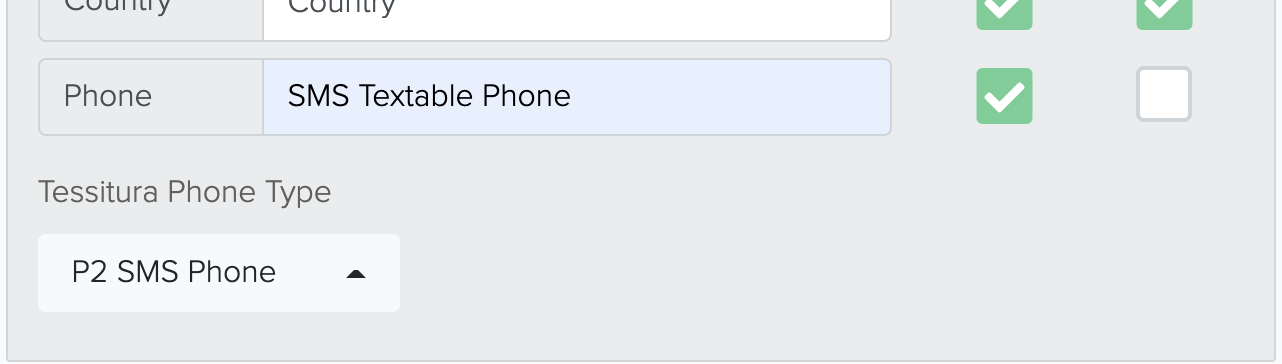
If Phone is enabled, you will need to select a Tessitura Phone Type from the drop down menu. The image below shows Phone enabled, but not required, The label has been changed to SMS Textable Phone and the Tessitura Phone Type has been set to P2 SMS hone (A phone type available to Prospect2 based organizations)
If any of the above options are enabled, they will be displayed on your form. If they are set to "Required," an asterisk will be appended to the label along with the Required Background color will be applied to the fields and the payment cannot be processed until it is filled out by your patron.
Payment Page
The Payment Page can be personalized to your style or branding. The following section has been split in two to accommodate all of the information contained in this collapsible.

The Headline text can be edited based on a general title or purpose of the form (i.e. “Support the Orchestra Today!” or “Keep Making a Difference” etc.). It is not a required section and can be blank.
The Headline Color can be edited with a hex code or RGB specific colors to match your branding. This will only affect your Headline text on this page. The headline color in your Payment Page and in your Thank You page are separate; don’t forget to change the color on the Thank You page, too!
The Body Copy can be edited to specific verbiage.
- Please note - Within the body of your text, there are many different CSS options you can include in this section.
The Body Copy Color can be edited with a hex code or RGB specific colors. This will only affect the text in the body of the form.
The Number of Gifts allows you to have a Goal Bar present under the body text. This can be enabled or disabled by toggling the checkbox to the left of the Number of Gifts text box.
- If your goal is to receive a certain number of gifts, you can utilize this option (the number can be edited). The Bar and Text colors can be edited based on your branding; however, this is one of the only spots where entering a hex code is not an option.
- If you are generating donations outside of your Donate2 Donation Form (via the phone, website, checks, etc.) you can use the Starting Amount and Starting Date to account for additional sources of donations. Once you know the current amount raised (after pulling a report in Tessitura), you can enter that amount into the Starting Amount field. You can then set the Starting Date to the day from which your Donate2 donations will count towards this campaign. Most likely, that will be the day you update the Starting Amount.
The Financial Goal allows you to have a Goal Bar present under the body text. This can be enabled or disabled by toggling the checkbox to the left of the Financial Goal text box.
- If your goal is to receive a certain amount in gifts, you can utilize this option (the goal number can be edited). The Bar and Text colors can be edited based on your branding; however, this is one of the only spots where entering a hex code is not an option.
- If you are generating donations outside of your Donate2 Donation Form (via the phone, website, checks, etc.) you can use the Starting Amount and Starting Date to account for additional sources of donations. Once you know the current amount raised (after pulling a report in Tessitura), you can enter that amount into the Starting Amount field. You can then set the Starting Date to the day from which your Donate2 donations will count towards this campaign. Most likely, that will be the day you update the Starting Amount.
The Default Ask is an editable text box where you can type in a preferred ask amount. Typically, this is set at $50 or $100, but it can be any amount you want.
The Amount Options can be selected via a multi-select drop down menu; however, if you choose to have a Default Ask, please be aware that the Default Ask will not activate unless it matches an amount selected in the Amount Options or Custom Amount Options.
- If the Default Ask is not configured or activated with a matching value, the Amount Options will default to the lowest amount available.
Other is set to a default of "Yes." This will allow your patron to enter their own amount in a text box on your form. If "No" is selected, your patron will only have the option to choose the amounts available in the drop down menu.
Behavior is set to a default of "Replace" and will replace the default ask with the alternate amount entered by your patron. The drop down menu will no longer be visible on the form. If Behavior is set to "In Addition," this will tack on the separate amount chosen by your patron to the amount selected in the drop down menu.
The Custom Amount Options allow you to enter specific amounts in the text box that are not available via the Amount Options drop down. (If you wanted to enter 31 or 72 or 183 you could!). You are able to enter more than one amount, just be sure to hit the tab key after each entry. This option can be left blank if you choose to only utilize the preset amount options.
The Cover Costs feature allows your patron the option to choose whether they’d like to cover transaction costs.
This option can be set to:
- "Yes" places a checkbox on the form giving the patron the option to cover the costs. They must select the checkbox if they want to cover costs.
- "Yes (Default Selected)" places a pre-selected checkbox on the form where the patron must unselect the checkbox to opt-out of covering the costs;
- "No" will remove the check box from the form completely.
You can also add a Cover Costs Maximum which will only allow the cover the costs up to a certain amount.
The Cover Costs checkbox color can be edited from the color square next to the text box.
The Marketing Opt-In is another check box option that can be added to your form if you choose. You can choose which Marketing option to give your patron from the drop down menu. The default for this setting is set to "No."
- If your Donate2 account is integrated with Prospect2, this option will be available via the dropdown menu and settings can be adjusted in the Prospect2 integration.
- If you are not integrated with Prospect2, you should only have the option of "Contact Permissions." which will add this information to the patron’s Tessitura account.
- Utilize the "None" option if you do not want the Marketing Opt-In checkbox available on your form.
The Marketing Opt In checkbox color can be edited from the color square next to the text box.
The Recurring Frequency allows your patron to choose a frequency should they want to give regularly. Default is set to "One Time"; however, you can check the One Time, Monthly, Quarterly, or Yearly options and these will be viewable via a drop down menu on your form.
- If a recurring option is selected, this tells Stripe to charge the chosen card regularly and automatically. If Monthly is selected, Stripe will charge on the same day every month. If Quarterly is selected, Stripe will charge every 3 months. If Yearly is selected, Stripe will charge on the same day the following year.
The Payment Button Text is an editable text box. Default is set to Pay Now; however, this can be set to your preferences.
The Payment Button Color can be edited with a hex code or RGB specific colors to match your organization’s branding.
If you are offering recurring payments, please view information about our Customer Portal Manager
here.
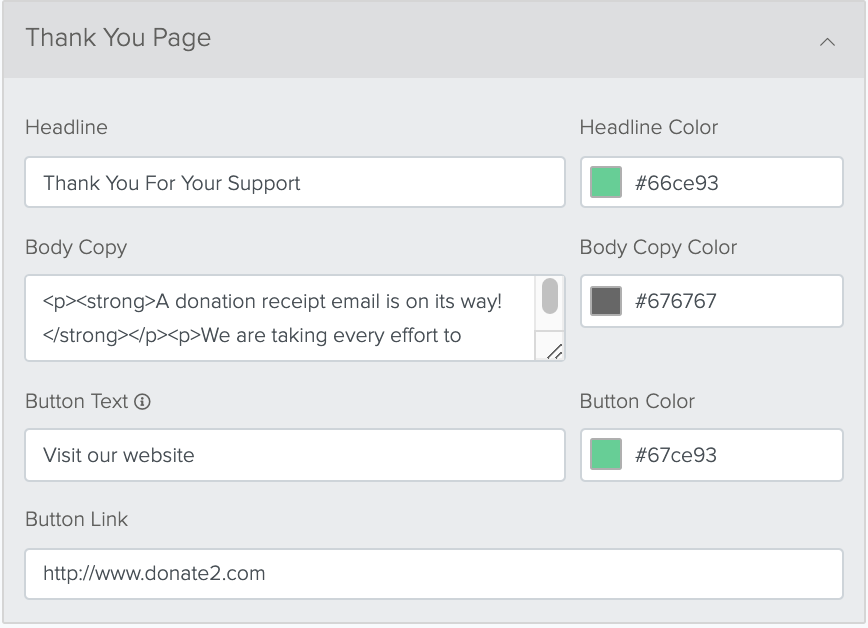
Thank You Page
Much like your Payment Page, your Thank You page is customizable to your preferences. This is the page that will appear once payment is complete.
The Headline text is editable to your preferences in the text box and the text color can be edited under Headline Color.
As in your Payment Page, the Body Copy is editable to your preferences and your Body Copy Color can be edited under Body Copy Color.
The Button Text, like your Payment Button Color, can be edited to your preference and your Button Color can be changed according to your preferences or branding.
The Button Link allows you to add a hyperlink to your button that, should your patron click on it, will take them to a webpage. This can be your organization’s website, performance information, or whatever you choose.
Titles and Labels
The options in this section allow you to edit the text on your Payment Page. You can adjust these options to your preferences or leave them with the default text. If any of the Title text boxes are empty, it will default to the original text settings.
The Amount Options labels are editable text boxes that allow the amounts chosen in the Amount Options section above to have labels. An example is the name of a membership level name next to a particular amount (i.e. $50 - Bard Circle, $100 - Ballet Shoes for a Student, or $83 - Individual Membership).
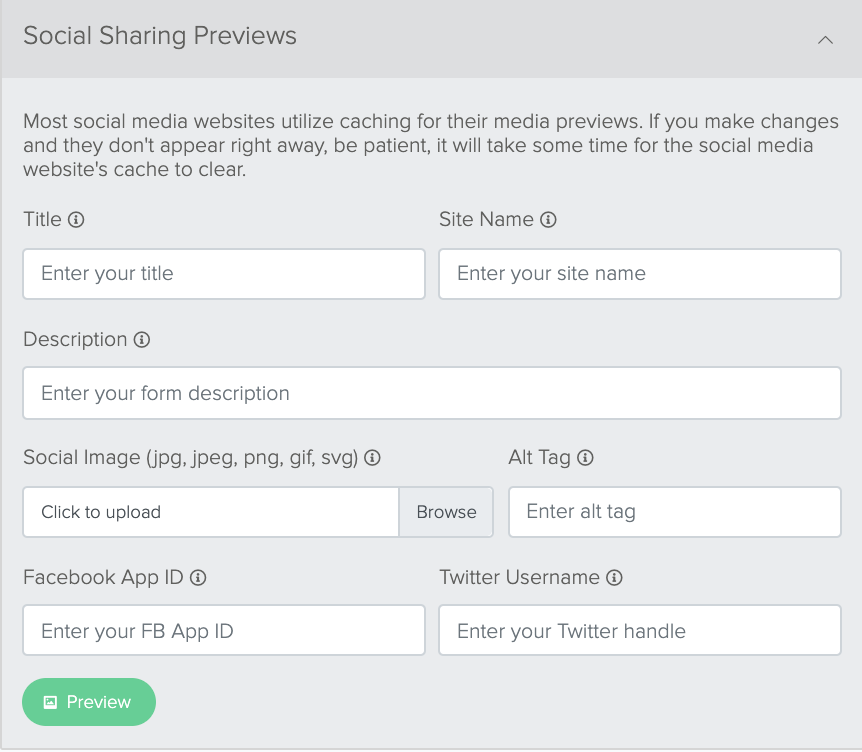
Social Sharing Previews
Social Sharing Previews allows you to customize how your link will look when shared via social media. This turns a form URL into an eye catching preview when shared on Facebook, Twitter, and other platforms. You can also configure Twitter and Facebook for analytics purposes. To learn more about the Social Sharing setup, please click
here.
When working in this section, if you click on the
Preview button, it will take you to
www.socialsharepreview.com where you will be able to view what your link looks like when shared on various social media platforms. Please keep in mind that
www.socialsharepreview.com caches your form, so if any changes are made, click the blue button in the top right corner to refresh the link.
Social Sharing Previews does not share or post the form to social media on your behalf. This is a tool to configure the preview and analytics when you or your patrons choose to share the form.
Tessitura TEST and LIVE Environments
These options are based on information from your Tessitura Integration.

The
Fund(s), On Account Method(s), Source, Channel, and
Receipt are all available via the drop down menus in each section. These options are what is active and available in your Tessitura database. The
Fund,
On Account, and
Receipt options can be configured; for more information, click
here.
Multiple Funds and On Account Methods can be selected in this section and a drop down menu will appear on your form for your patron to choose where they would like their gift to go (i.e. you can have options for the General Fund, Education, and Young Artist Program, and your patron will be able to select one of these from the drop down menu in your form). If only one Fund or On Account is configured, no options will be viewable by your patron on the form.
The Source is a searchable function that connects to your Tessitura database which allows you to type in the title of a specific source you’d like attributed to this form. You will need to type in at least three characters in the search field before any options appear.
The Channel option is also a searchable function that connects to your Tessitura database. Almost always, you will want to select Donate2; however, you can create a separate channel for Stream2 or Flex2 forms.
The Receipt option is the final searchable function connected to your Tessitura database. If you choose to do so, you can create a specific receipt in the HTML editor of Tessitura that can be assigned to this form. You do not need to have a receipt available from Tessitura. You have the option of creating a more customized receipt email in your Message Manager.
Messaging
Messaging allows you to select an email option from your Message Manager via the drop down menu. This email will be sent out when the transaction is completed (
Time of Donation) and can be designed or branded to your liking. For more information about the Message Manager, please click
here.